前言
在AVL中提到了,当插入和删除频率较高时,我们选择红黑树来降低因不断的维护平衡带来的时间损耗。在诸多地方(比如JDK1.8的HashMap……)得到了广泛的应用。那么,什么是红黑树,为什么就这么牛逼?我们一起来解开其神秘的面纱~
什么是红黑树

红黑树是一种特定类型的二叉树,它是在计算机科学中用来组织数据比如数字的块的一种结构。 [4]
红黑树是一种平衡二叉查找树的变体,它的左右子树高差有可能大于 1,所以红黑树不是严格意义上的平衡二叉树(AVL),但 对之进行平衡的代价较低, 其平均统计性能要强于 AVL 。 [2]
由于每一棵红黑树都是一颗二叉排序树,因此,在对红黑树进行查找时,可以采用运用于普通二叉排序树上的查找算法,在查找过程中不需要颜色信息。
以上是百度百科的介绍。我简单总结就是
- 一种二叉树
- 具备平衡效果
- 由红黑两种颜色的节点组成
- 增删改差性能很强👍
那为什么叫红黑树呢,难道红色和黑色有什么魔力吗?是这样的,红黑树的发明者鲁道夫·贝尔非常喜欢红色和黑色~
红黑树的性质
- 性质1:每个节点非黑即红
- 性质2:根节点是黑色
- 性质3:每个叶子节点(NULL)是黑色
- 性质4:每个红色节点的两个子节点一定都是黑色。也就是说不存在两个红色节点相连
- 性质5:任意节点到每个叶子节点的路径都包含相同数量的黑节点,也就是所谓的黑色完美平衡
- 性质5.1:可能推导出如果一个节点拥有一个黑色节点,那么该节点肯定有两个子节点
啊!条条框框的好多呀!
不要被这么多性质吓到,先思考一个问题,红黑树到底是怎么产生的,为什么刚好用两种颜色来描述节点,不能是三种?难道因为我们都是玩二进制的男人吗?
首先,我们要了解另一种树:2-3树(念二三树)
先说一说2-3树
2-3树不是一种严格由一个节点只有一个数据域的节点构成的树,其存在2叉节点和3叉节点

其中,只有一个数据域的就是2叉节点:左叉指向小与该节点数据域的节点,右叉则是相反的情况
有两个数据域的就是3叉节点,左指向小于该节点中较小数的节点,中间是介于该节点两个数据域的节点,右边则大于较大者的节点
来看一下1-7是如何构建一颗2-3树的过程体会一下:
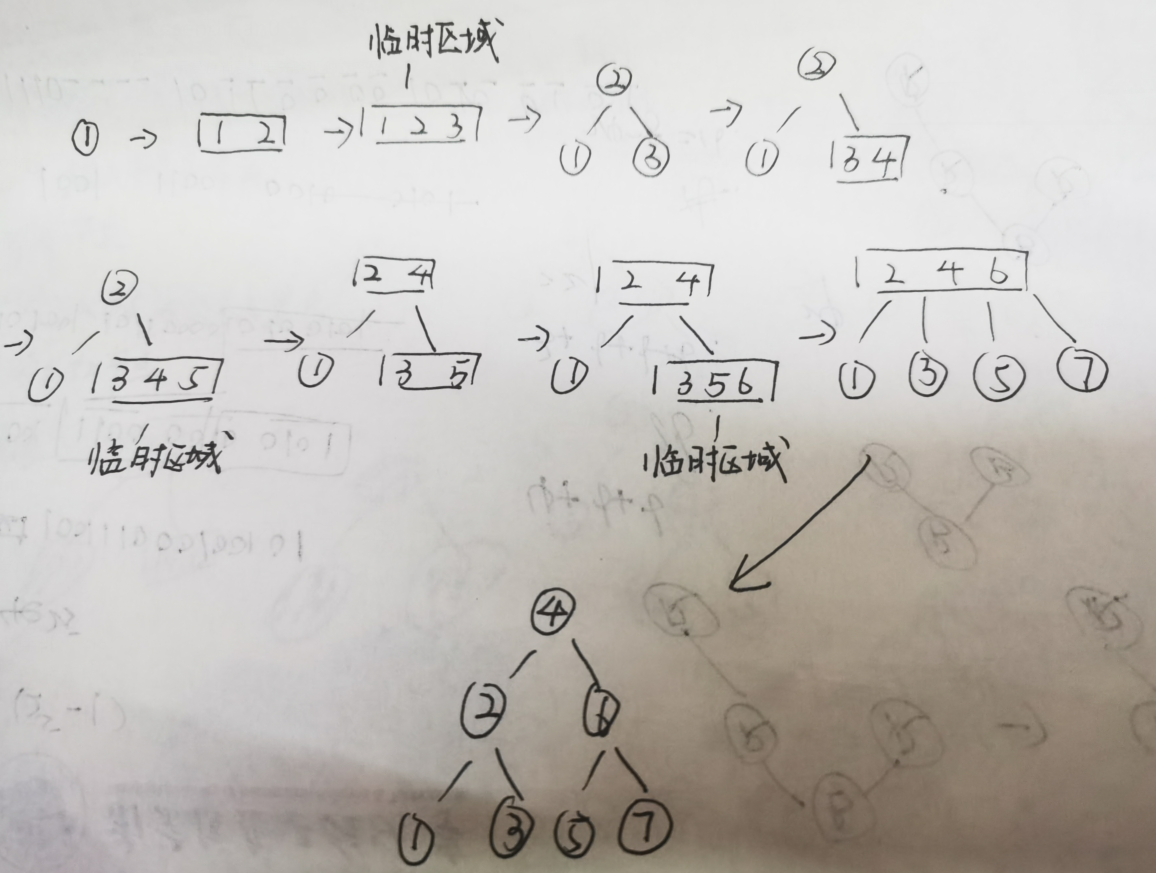
可以看到只要在建树的过程中满足2-3树的限制,就可以保证这棵树保证一定的平衡度。
2-3树跟红黑树之间就像是在面向对象编程过程中接口跟具体实现类的关系,红黑树就是针对2-3树的一种实现
2-3树的概念十分模糊,虽然我们通过示意图可以很简单的体会到2-3树想要表达的意思,但是编程就相当的难实现。于是就有智者创建了红黑树,通过红与黑两种颜色在创建树的过程中加以约束,以满足2-3树的性质
2-3树与红黑树的比对
那么,2-3树跟红黑树有什么联系,我们来看看2-3树与红黑树之间是怎么转化的:

我个人的理解(仅提供一个看待红黑树的角度):
- 红色节点可看作是黑色父节点的附庸,是一种辅助的展示手段。因为红色节点会合成到黑色节点中成为2-3树中的3叉节点
- 也因此,不可能有两个相连的红色节点,否则无法还原成一个3叉节点。这样就解释了性质4
- 当一颗红黑树还原成2-3树时,就是一颗”完美二叉树“!(肥肥胖胖,完美稳定) 此时也就是江湖上说的黑色平衡。此时也理所当然满足了性质5任意节点到每个叶子节点的路径都包含相同数量的黑节点
- 当满足所有条件性质时,最长的一条路径就不会超过最短的一条路径的2倍。使得查找的时间复杂最坏不会超过O(2logN)
红黑树插入节点的分类讨论
三种基本操作
变色
左旋
- 对应AVL中的概念,为达到黑色平衡所做的操作
- 示例代码
1
2
3
4
5
6
7
8
9
10
11
12
13
14
15
16
17
18
19
20
21
22
23
| @SuppressWarnings("all")
private void leftRotate(RbNode<T> x) {
RbNode<T> y = x.rightChild;
x.rightChild = y.leftChild;
if (y.leftChild != null) {
y.leftChild.parent = x;
}
y.parent = x.parent;
if (x.parent != null) {
if (x.parent.leftChild == x) {
x.parent.leftChild = y;
} else {
x.parent.rightChild = y;
}
} else {
this.root = y;
}
y.leftChild = x;
x.parent = y;
}
|
右旋
- 对应AVL中的概念,为达到黑色平衡所做的操作
- 示例代码
1
2
3
4
5
6
7
8
9
10
11
12
13
14
15
16
17
18
19
20
21
22
23
| @SuppressWarnings("all")
private void rightRotate(RbNode<T> x) {
RbNode<T> y = x.leftChild;
x.leftChild = y.rightChild;
if (y.rightChild != null) {
y.rightChild.parent = x;
}
y.parent = x.parent;
if (x.parent != null) {
if (x.parent.leftChild == x) {
x.parent.leftChild = y;
} else {
x.parent.rightChild = y;
}
} else {
this.root = y;
}
y.rightChild = x;
x.parent = y;
}
|
红黑树的构建并不复杂,只要将所有可能出现的情况讨论到位,代码按部就班的写就行了
情况1
为空树,不废话直接插入。但注意根节点为黑色
情况2
插入的Key已经存在。搜索到对应的节点,更新数据值
情况3
插入的节点的父节点为黑节点,那么直接上红色节点,不会破坏黑色平衡
情况4
父亲节点为红色,讨论叔叔节点的颜色
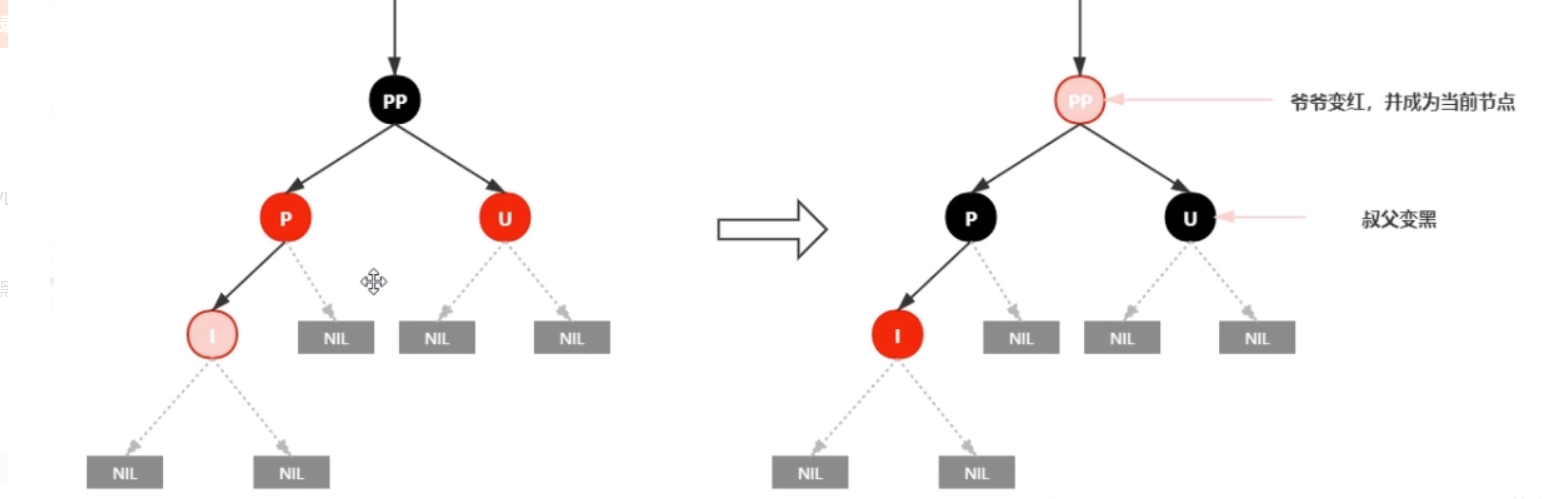
情况4.1
叔叔节点存在且为红色节点
处理方案
- 父辈节点变为黑色
- 爷爷节点变为红色
- 将爷爷节点设为当前节点,进行后续操作
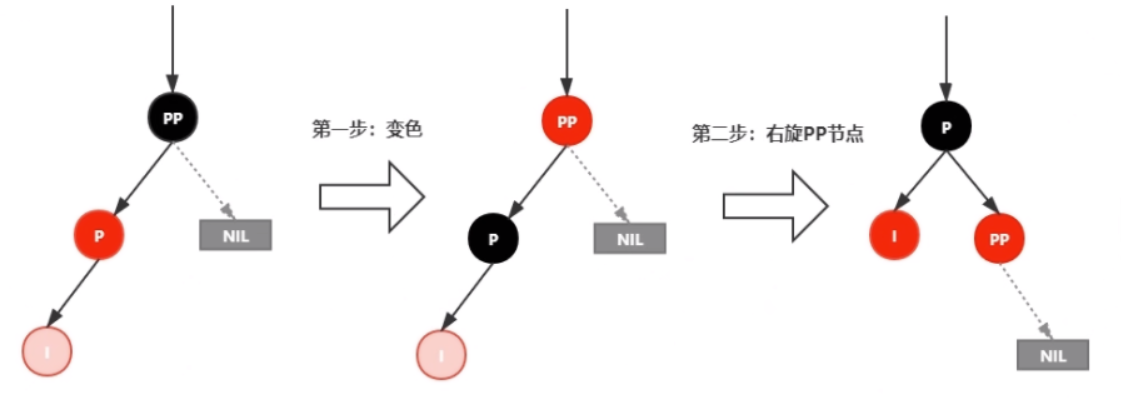
情况4.2
叔叔节点不存在或为空
4.2.1
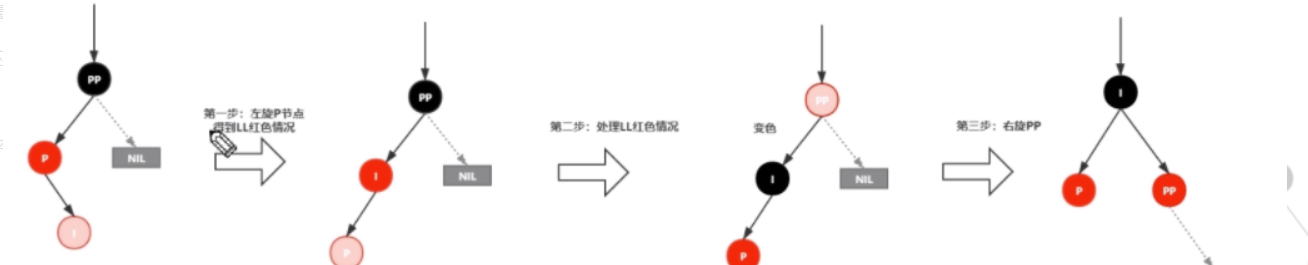
4.2.2
- 新插入的节点为父亲的右孩子
- 先左旋,再变色,后右旋
4.3
4.2情况的对称操作
代码示例
1
2
3
4
5
6
7
8
9
10
11
12
13
14
15
16
17
18
19
20
21
22
23
24
25
26
27
28
29
30
31
32
33
34
35
36
37
38
39
40
41
42
43
44
45
46
47
48
49
50
51
| private void insertFixUp(RbNode<T> node) {
RbNode<T> parent, grandParent, uncle;
while ((parent = node.parent) != null && parent.color == RED) {
grandParent = parent.parent;
if (parent == grandParent.leftChild) {
if ((uncle = grandParent.rightChild) != null && uncle.color == RED) {
parent.color = BLACK;
uncle.color = BLACK;
grandParent.color = RED;
node = grandParent;
continue;
}
if (parent.rightChild == node) {
leftRotate(parent);
RbNode<T> tmp = parent;
parent = node;
node = tmp;
}
parent.color = BLACK;
grandParent.color = RED;
rightRotate(grandParent);
} else {
if ((uncle = grandParent.leftChild) != null && uncle.color == RED) {
parent.color = BLACK;
uncle.color = BLACK;
grandParent.color = RED;
node = grandParent;
continue;
}
if (parent.leftChild == node) {
rightRotate(parent);
RbNode<T> tmp = parent;
parent = node;
node = tmp;
}
parent.color = BLACK;
grandParent.color = RED;
leftRotate(grandParent);
}
}
this.root.color = BLACK;
}
|
其中,红黑树节点类代码:
1
2
3
4
5
6
7
8
9
10
11
12
13
14
15
16
17
18
19
20
21
22
23
24
25
26
27
28
29
30
31
32
33
34
35
36
37
38
39
| public class RbNode<T extends Comparable<T>> {
public boolean color;
public T key;
public RbNode<T> leftChild;
public RbNode<T> rightChild;
public RbNode<T> parent;
public RbNode(boolean color, T key) {
this(color, key, null, null, null);
}
public RbNode(boolean color, T key, RbNode<T> leftChild, RbNode<T> rightChild, RbNode<T> parent) {
this.color = color;
this.key = key;
this.leftChild = leftChild;
this.rightChild = rightChild;
this.parent = parent;
}
}
|
引入展示工具类
从网上借鉴了一个工具类,可以形象的展示一颗红黑树
1
2
3
4
5
6
7
8
9
10
11
12
13
14
15
16
17
18
19
20
21
22
23
24
25
26
27
28
29
30
31
32
33
34
35
36
37
38
39
40
41
42
43
44
45
46
47
48
49
50
51
52
53
54
55
56
57
58
59
60
61
62
63
64
65
66
67
68
69
70
71
72
73
74
75
76
77
78
79
80
81
82
83
84
85
86
87
88
89
90
| public class TreeOperation {
public static int getTreeDepth(RbNode<?> root) {
return root == null ? 0 : (1 + Math.max(getTreeDepth(root.leftChild), getTreeDepth(root.rightChild)));
}
private static void writeArray(RbNode<?> currNode, int rowIndex, int columnIndex, String[][] res, int treeDepth) {
if (currNode == null) {
return;
}
res[rowIndex][columnIndex] = String.format("%s-%s ", currNode.key, "true".equals(String.valueOf(currNode.color)) ? "R" : "B");
int currLevel = ((rowIndex + 1) / 2);
if (currLevel == treeDepth) {
return;
}
int gap = treeDepth - currLevel - 1;
if (currNode.leftChild != null) {
res[rowIndex + 1][columnIndex - gap] = "/";
writeArray(currNode.leftChild, rowIndex + 2, columnIndex - gap * 2, res, treeDepth);
}
if (currNode.rightChild != null) {
res[rowIndex + 1][columnIndex + gap] = "\\";
writeArray(currNode.rightChild, rowIndex + 2, columnIndex + gap * 2, res, treeDepth);
}
}
public static void show(RbNode<?> root) {
if (root == null) {
System.out.println("EMPTY!");
}
int treeDepth = getTreeDepth(root);
int arrayHeight = treeDepth * 2 - 1;
int arrayWidth = (2 << (treeDepth - 2)) * 3 + 1;
String[][] res = new String[arrayHeight][arrayWidth];
for (int i = 0; i < arrayHeight; i++) {
for (int j = 0; j < arrayWidth; j++) {
res[i][j] = " ";
}
}
writeArray(root, 0, arrayWidth / 2, res, treeDepth);
for (String[] line : res) {
StringBuilder sb = new StringBuilder();
for (int i = 0; i < line.length; i++) {
sb.append(line[i]);
if (line[i].length() > 1 && i <= line.length - 1) {
i += line[i].length() > 4 ? 2 : line[i].length() - 1;
}
}
System.out.println(sb.toString());
}
}
}
|
测试与总结
1
2
3
4
5
6
7
8
9
10
| private static final Integer[] arrays = new Integer[]{3, 5, 8, 7, 15, 19, 18, 30, 33};
@Test
public void createRbTree() {
RbTree<Integer> rbTree = new RbTree<>();
for (Integer key : arrays) {
rbTree.createTree(key);
}
TreeOperation.show(rbTree.root);
}
|
1
2
3
4
5
6
7
| 8-B
/ \
5-R 18-R
/ \ / \
3-B 7-B 15-B 30-B
/ \
19-R 33-R
|
关于红黑树节点的删除面临的情况较多,比插入要复杂的多,这里就不再进行讨论了。本质也是讨论出所有的情况,将每种情况写出对应的操作代码,再组装起来,就可以了,只不过复杂度很高,也相当烧脑。能够牢固的把握和理解红黑树的构建过程和与2-3树的转化的概念,就不错啦!
相关代码可以在 github.com/Cheung0-bit… 中找到